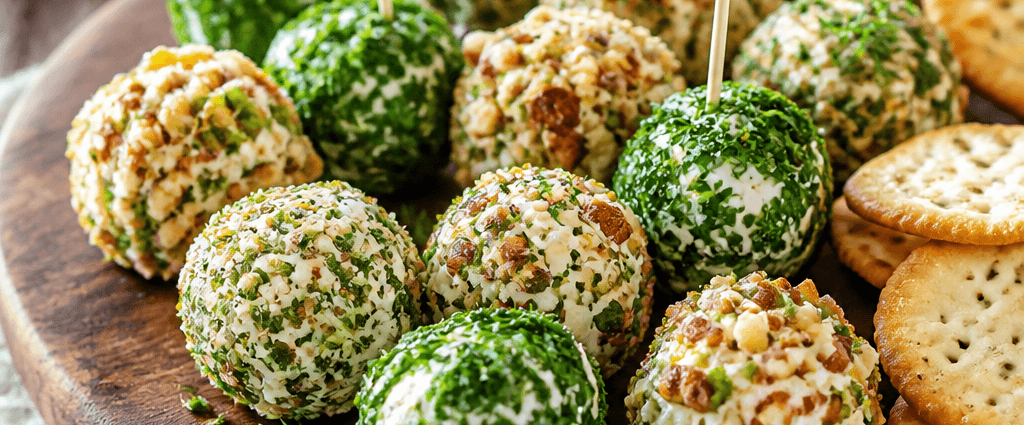
Whether you are hosting a small gathering or simply craving an easy, grab-and-go treat to enjoy with a glass of wine, these mini cheese balls with fresh herbs and crunchy nuts are an absolute must-try. They are rich, creamy, and packed with bright, savory flavor, yet they look impressively fancy without demanding much effort at all. If there is one appetizer guaranteed to disappear from the platter in minutes, this is it.
What makes these little bites so irresistible is the contrast of textures and flavors: smooth, tangy cheese wrapped in a delicate coating of herbs and toasted nuts, brightened with a hint of lemon and garlic. They come together in under 20 minutes of hands-on work, require no cooking whatsoever, and can be dressed up in countless ways. Stylish, simple, and endlessly customizable, this recipe is calling your name.
Why You’ll Love This Recipe
First and foremost, these cheese balls are quick and easy. You can whip up the entire batch in under 20 minutes of active time, with just a short chill in the fridge before serving. There is no oven, no special equipment, and no complicated technique involved, which makes this the kind of recipe you can pull together even when guests are already on their way.
They are also perfect for entertaining. These bites look elegant enough for the most special occasions, from holiday parties to bridal showers, yet they are simple enough to make on a whim. Arranged on a platter with toothpicks, they bring a show-stopping presentation that always earns compliments, and they photograph beautifully for good measure.
Best of all, this recipe is completely customizable. You can swap the nuts, change up the herbs, add a little heat, or even make it nut-free or vegan. That flexibility means you can tailor these cheese balls to any crowd, any season, and any flavor preference, making them a reliable go-to for years to come.
Ingredients
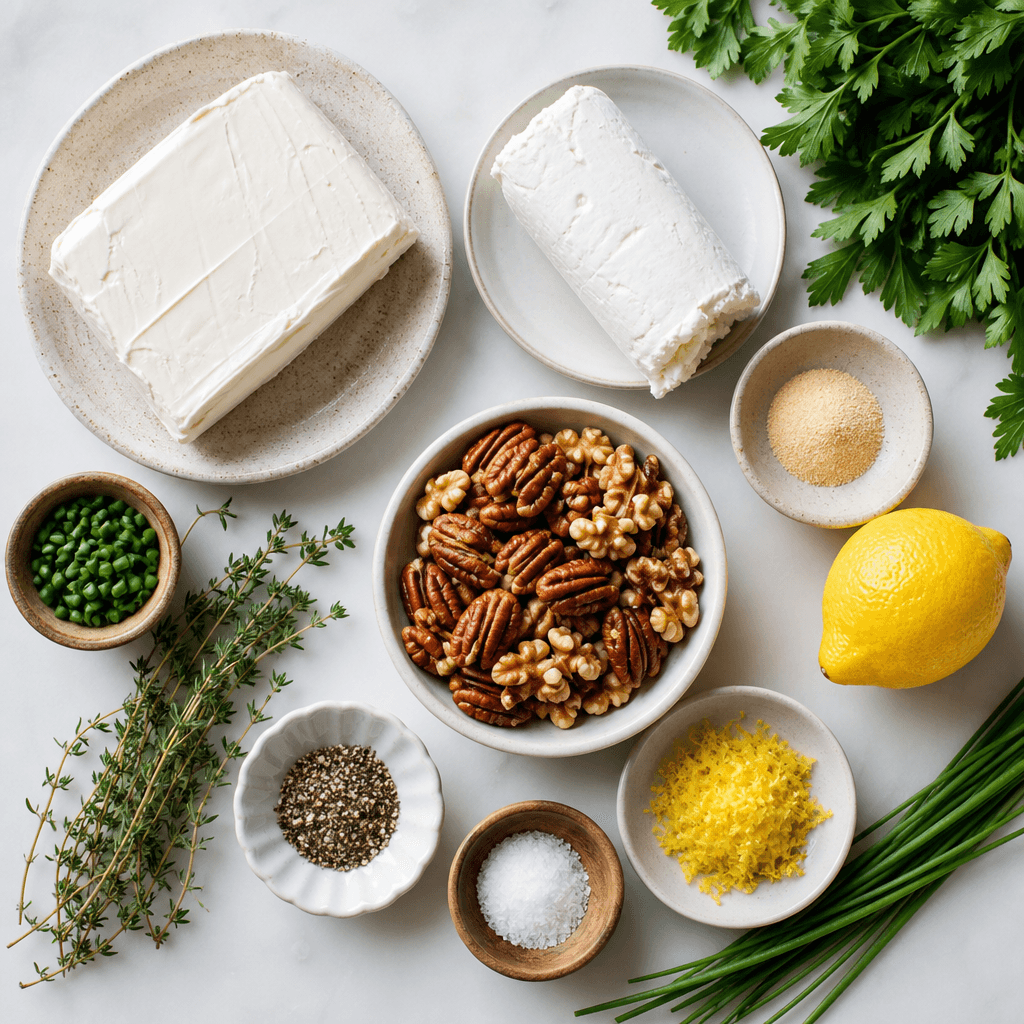
The foundation of these cheese balls is 8 ounces of cream cheese, softened to room temperature, paired with 4 ounces of goat cheese. Full-fat cream cheese gives the creamiest texture, while the goat cheese adds a lovely tangy punch that plays beautifully with fresh herbs. If goat cheese is not your favorite, feta makes a saltier substitute, and ricotta or blue cheese work well too.
To season the cheese base, you will need 1 teaspoon of garlic powder, 1 teaspoon of lemon zest, and salt and pepper to taste. The garlic powder adds a subtle, essential savory note, while the lemon zest brightens the rich cheeses and keeps every bite feeling fresh rather than heavy.
For the signature coating, gather 1/4 cup of mixed fresh herbs such as parsley, thyme, and chives, finely chopped, along with 1/4 cup of crushed nuts like pecans or walnuts. Fresh herbs are truly key here for that vibrant flavor and color, though dried herbs can work in a pinch. Feel free to choose whatever nuts you love best, or go seed-based for a nut-free option.
Step-by-Step Instructions
Begin by mixing the cheese base. In a medium-sized bowl, combine the softened cream cheese, goat cheese, garlic powder, lemon zest, salt, and pepper. Use a fork or a hand mixer to blend everything together until the mixture is completely smooth and creamy. Taking the time to soften the cheese first makes this step effortless and ensures there are no stubborn lumps.
Next, shape the mixture into balls. Using a tablespoon or a small cookie scoop, portion out the cheese mixture and roll each portion between your palms into a bite-sized ball about 1 inch in diameter. This size is ideal for popping straight into your mouth and looks charming on a platter. If the mixture feels too soft to handle, pop it in the fridge for a few minutes to firm up.
Now prep the coatings. Finely chop your chosen herbs and nuts and place them in separate shallow bowls, or combine them for a mixed coating. Roll each cheese ball through the herbs, the nuts, or both, pressing gently so the coating adheres evenly on all sides. A light, even layer is exactly what you want here.
Finally, chill and serve. Place the finished cheese balls in the refrigerator for at least 30 minutes so they firm up and the flavors have time to meld together. When you are ready to serve, arrange them on a platter with toothpicks or small skewers for an adorable, party-ready presentation that guests can grab with ease.

Tips for the Best Cheese Balls
Do not skip softening the cheese. Cold cream cheese simply will not blend smoothly, making the mixture lumpy and harder to shape into neat little balls. Letting it sit at room temperature for 30 minutes makes all the difference. These are also wonderfully make-ahead friendly; you can prepare them a full day in advance and store them in an airtight container in the fridge until you are ready to serve.
When it comes to coating, remember that less is more. A light covering of herbs and nuts brings out the perfect balance of flavors, while too heavy a layer can overpower the delicate, tangy cheese. If you love easy, elegant party bites like these, be sure to try our cranberry brie bites and these fresh caprese skewers with balsamic glaze for a stunning appetizer spread.
Ready to make them your own? Stir a pinch of cayenne or red pepper flakes into the cheese for a spicy kick, use toasted sesame or sunflower seeds for a nut-free coating, or swap in vegan cream cheese and goat cheese for a dairy-free version. Serve alongside crackers, crostini, or crisp veggies, with a chilled glass of white wine or sparkling rosé to complete the moment.
Kitchen Gear for This Recipe
- Instant-Read Meat Thermometer
- Enameled Cast Iron Dutch Oven
- Heavy-Duty Sheet Pan Set
- Glass Mixing Bowl Set
As an Amazon Associate, The Kitchen’s Aid earns from qualifying purchases at no extra cost to you.
Frequently Asked Questions
Can I freeze these cheese balls?
Yes. After forming the balls but before coating them, freeze them on a baking sheet until solid, then transfer to a freezer-safe bag. Thaw in the fridge and roll in herbs and nuts right before serving.
How long will they last in the fridge?
Stored in an airtight container, these cheese balls will keep for up to 3 days in the refrigerator, making them ideal for prepping ahead of a party.
What can I substitute for goat cheese?
If goat cheese is not your favorite, feta, ricotta, or even blue cheese all work well. Choose feta for a saltier bite or blue cheese for a bolder, more pungent flavor.
Can I make these nut-free?
Absolutely. Simply coat the cheese balls in toasted sesame seeds or sunflower seeds instead of nuts for the same satisfying crunch without the allergens.
What should I serve with mini cheese balls?
They pair beautifully with crackers, crostini, sliced baguette, or fresh vegetable sticks, and a glass of crisp white wine or sparkling rosé rounds them out perfectly.
For more wholesome nibbles and inspiration, browse these healthy eating ideas to fill out your appetizer table. And when you make these mini cheese balls, I would love to see your creations, so be sure to tag @thekitchensaid on Instagram and show off your beautiful party platter.
Mini Cheese Balls with Fresh Herbs and Crunchy Nuts
American · Appetizer
Rich, creamy mini cheese balls with fresh herbs and crunchy nuts, an easy no-cook appetizer ready in under 20 minutes.
Ingredients
- 8 oz cream cheese, softened
- 4 oz goat cheese
- 1 tsp garlic powder
- 1 tsp lemon zest
- 1/4 cup mixed fresh herbs (parsley, thyme, chives), finely chopped
- 1/4 cup crushed nuts (pecans, walnuts, or your favorite)
- Salt and pepper, to taste
Instructions
- In a medium bowl, combine softened cream cheese, goat cheese, garlic powder, lemon zest, salt, and pepper and blend until smooth and creamy.
- Using a tablespoon or small scoop, roll the mixture into bite-sized 1-inch balls.
- Finely chop herbs and nuts, then roll each cheese ball in the coating, pressing gently so it sticks.
- Chill the cheese balls in the fridge for at least 30 minutes, then arrange on a platter with toothpicks and serve.
Nutrition: 70 calories
Made this? Rate it