
There is something quietly magical about thumbprint cookies, those little rounds of buttery dough with a glistening pocket of jam pressed into the center. They have been a beloved treat in my family for as long as I can remember, the kind of cookie my mom and I would make together around the holidays, taking turns pressing our thumbs into the soft dough and choosing which filling went where. They feel nostalgic and celebratory at the same time, equally at home on a fancy tea tray or a weeknight cookie plate.
What I love most is how forgiving and flexible they are. The dough comes together with just a handful of pantry staples, and the fillings are entirely up to you. Raspberry jam, apricot preserves, a swirl of chocolate hazelnut spread, a spoonful of lemon curd, they all work beautifully. If you have ever wanted a classic cookie with an elegant little twist, this is the one that will win your heart and your taste buds in a single bite.
Why You’ll Love This Recipe
These cookies strike the perfect balance between tender, crumbly, buttery dough and a sweet, slightly jammy center. The contrast of textures is what makes them so irresistible, and because the dough itself is only lightly sweetened, the filling gets to shine. Every bite tastes rich and homemade without ever feeling heavy or cloying.
They are also wonderfully customizable, which makes them a joy to bake for a crowd. You can fill one tray with three or four different jams and preserves, turning a single batch into a colorful assortment that looks like it came from a bakery. That variety makes them ideal for cookie swaps, holiday platters, and edible gifts, and it means everyone at the table gets to pick a favorite.
Finally, they are practical. The dough is friendly to make ahead, the baked cookies stay fresh for days in an airtight container, and they freeze beautifully. They are also a genuinely fun project to make with little ones, since pressing the thumbprints and spooning in the fillings is exactly the kind of hands-on task children adore.
Ingredients
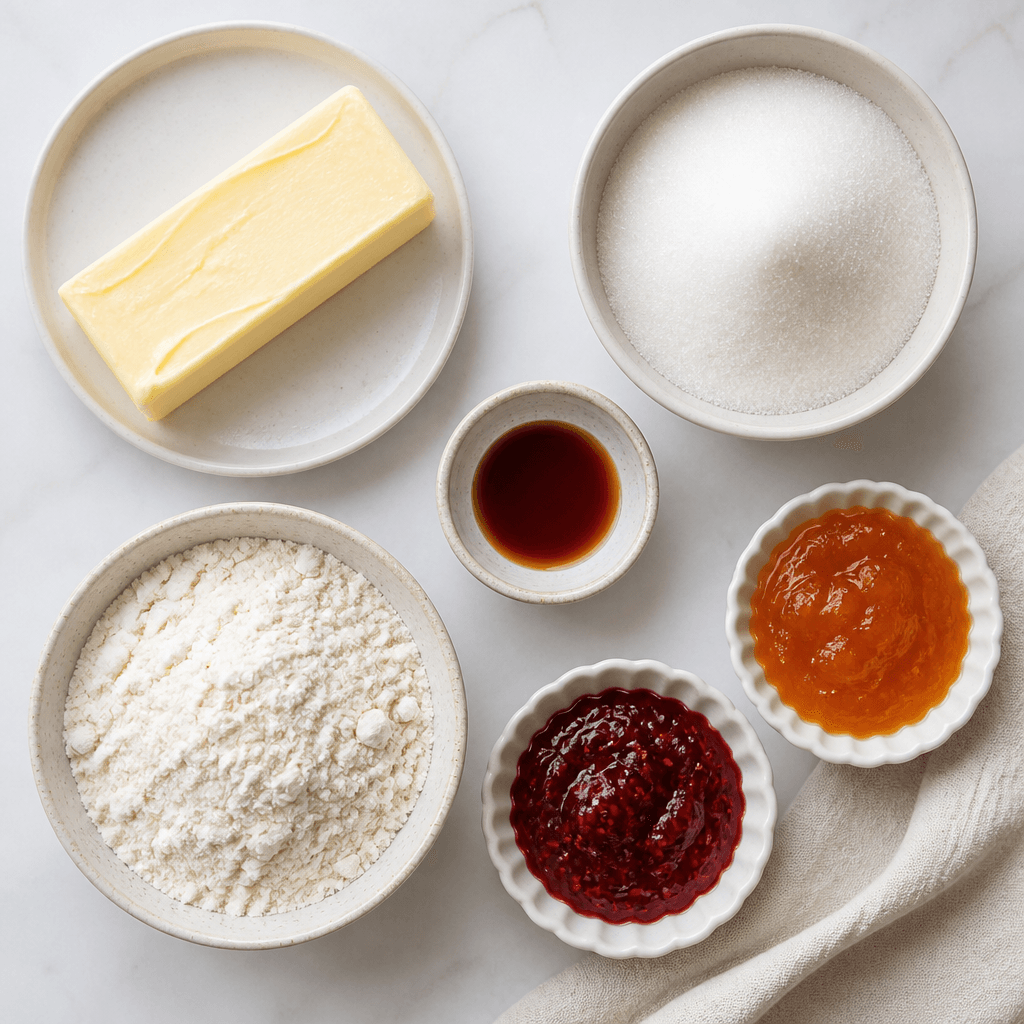
The dough starts with 1 cup of unsalted butter, softened to room temperature. Softened butter is the secret to that tender, melt-in-your-mouth crumb, so let it sit out until it gives easily to a gentle press. Using unsalted butter lets you control the flavor and keeps the cookies from tasting salty. You will cream it together with 2/3 cup of granulated sugar, which sweetens the dough just enough without overpowering the delicate fillings.
From there you will add 1 teaspoon of vanilla extract for warmth and depth, and 2 cups of all-purpose flour to build the structure that holds each cookie together. That is the entire base, simple and dependable. For the centers, reach for your favorite assorted fillings, such as raspberry jam, apricot preserves, or a dollop of chocolate hazelnut spread. A light dusting of powdered sugar over the finished cookies is entirely optional, but it adds a festive, snowy finish.
If you want to elevate the flavor even further, try stirring a pinch of almond extract into the dough. It pairs especially well with fruit fillings and gives the cookies a subtle bakery-style aroma. Homemade preserves are another lovely upgrade if you happen to have some on hand.
Step-by-Step Instructions
Begin by preheating your oven to 350°F (175°C) and lining two baking sheets with parchment paper. The parchment keeps the cookies from sticking and makes cleanup effortless, so it is worth taking the moment to set it up before you start mixing.
In a large mixing bowl, cream the softened butter and granulated sugar together until the mixture is light and fluffy. This usually takes about two to three minutes with a hand mixer, and it is an important step, since all that whipping incorporates air and sets up the tender texture. Once the butter looks pale and creamy, mix in the vanilla extract, then gradually add the flour on low speed until a soft dough comes together. Try not to overwork it at this stage.
Roll the dough into 1-inch balls and arrange them about 2 inches apart on your prepared baking sheets. Using your thumb, or the rounded back of a teaspoon, press a small indentation into the center of each ball. Spoon roughly 1/2 teaspoon of your chosen filling into each little well, taking care not to overfill, since too much jam can bubble over and spread during baking.
Bake the cookies for 12 to 15 minutes, or until the edges are just beginning to turn golden. They should look set but still pale on top. Let them rest on the baking sheets for about 5 minutes so they can firm up, then transfer them to a wire rack to cool completely. If the thumbprints puff up during baking, gently press them back down with a spoon while the cookies are still warm.

Tips for the Best Thumbprint Cookies
If your kitchen runs warm or the dough feels soft, chill the rolled balls in the refrigerator for about 15 minutes before baking. Cold dough holds its shape far better, which means neater cookies and tidier thumbprint wells. This small step makes a noticeable difference in how polished the finished cookies look.
Choose thicker jams and preserves over runny ones whenever you can, since they stay put in the center instead of spreading. A quality raspberry or apricot preserve holds beautifully, and chocolate hazelnut spread sets into a soft, fudgy center as it cools. For a nutty variation, roll the dough balls in finely chopped nuts before pressing the thumbprints, which adds a lovely crunch and toasty flavor. If you enjoy these, you will also love these cherry almond thumbprint cookies, and for a more elegant sandwich-style treat, try these buttery raspberry Linzer cookies.
To keep them fresh, store the cooled cookies in an airtight container at room temperature for up to 5 days, or freeze them for up to 2 months. If you freeze the unbaked dough balls, add the filling right before baking so the jam stays bright and glossy. A fresh dusting of powdered sugar just before serving makes even day-old cookies look freshly baked.
Kitchen Gear for This Recipe
As an Amazon Associate, The Kitchen’s Aid earns from qualifying purchases at no extra cost to you.
Frequently Asked Questions
Can I make these cookies gluten-free?
Absolutely. Substitute the all-purpose flour with a good 1:1 gluten-free baking blend and the cookies will come out beautifully tender. Look for a blend that already contains xanthan gum for the best structure.
Which fillings work best?
Thick jams and preserves like raspberry and apricot are the classic choices, but chocolate hazelnut spread, caramel, and lemon curd are equally wonderful. Just avoid very thin, runny jams, which tend to spread during baking.
Can I make the dough ahead of time?
Yes. You can prepare the dough, roll it into balls, and freeze them unbaked. Add the filling right before they go into the oven, and add a minute or two to the baking time if baking from frozen.
Why did my thumbprints flatten out?
This usually happens when the butter is too warm or the dough is not chilled. Refrigerate the shaped dough balls for 15 minutes before baking, and gently re-press any wells with a spoon as soon as the cookies come out of the oven.
How many cookies does this recipe make?
This batch yields about 24 cookies, though the exact number depends on how large you roll your dough balls. Keeping them to a consistent 1-inch size helps everything bake evenly.
These thumbprint cookies are proof that simple ingredients and a little love can create something truly special. If you are looking to round out your baking with more wholesome bites, you will find plenty of inspiration in these healthy eating ideas. When your cookies come out of the oven looking perfectly jeweled, snap a photo and tag @thekitchensaid on Instagram, I truly love seeing your creations.
Thumbprint Cookies
American · Dessert
Buttery, tender thumbprint cookies with jewel-toned jam centers. Easy to make, endlessly customizable, and perfect for holidays, gifting, or tea time.
Ingredients
- 1 cup unsalted butter, softened
- 2/3 cup granulated sugar
- 1 tsp vanilla extract
- 2 cups all-purpose flour
- Assorted fillings (raspberry jam, apricot preserves, chocolate hazelnut spread)
Instructions
- Preheat oven to 350F (175C) and line two baking sheets with parchment paper.
- Cream the softened butter and granulated sugar until light and fluffy, about 2 to 3 minutes.
- Mix in the vanilla extract, then gradually add the flour on low speed until a soft dough forms.
- Roll the dough into 1-inch balls and place 2 inches apart on the baking sheets.
- Press a small indentation into the center of each ball with your thumb or a teaspoon.
- Fill each indentation with about 1/2 teaspoon of your chosen filling, taking care not to overfill.
- Bake for 12 to 15 minutes until the edges just begin to turn golden.
- Cool on the baking sheets for 5 minutes, then transfer to a wire rack to cool completely.
Nutrition: 130 calories
Made this? Rate it