
Maple Pumpkin Pie Bars: An Autumn-Inspired Treat You’ll Love
If you love the warm spices of fall and the classic flavors of pumpkin pie, these Maple Pumpkin Pie Bars are made just for you! Think of them as a hand-held version of pumpkin pie with a delightful maple twist—perfect for grabbing on the go, packing in a lunch, or serving at your next gathering. Plus, they’re way easier to make than rolling out a traditional pie crust.
If you’re looking for a treat that blends cozy fall vibes with a touch of sweet maple goodness, these bars are your next obsession!
Why You’ll Love This Recipe
- Easy to Make: No pie crust drama—these bars are straightforward and use pantry staples.
- Make-Ahead Friendly: These bars actually taste even better after chilling, making them a great dessert option for planning ahead.
- Rich Maple Flavor: The maple syrup adds warmth and depth to the sweet pumpkin, bringing cozy to a whole new level.
- Perfect for Sharing: Since these are bars, they’re easy to slice and serve to a crowd. Plus, there’s none of that “who gets the last slice?” drama!
Ingredients Breakdown
- Graham Cracker Crumbs: This is your classic base for so many dessert bars. If you’re gluten-free, opt for gluten-free graham crackers—totally works here!
- Melted Butter: Helps bring the crust together and gives it a rich flavor. Use unsalted to control the saltiness.
- Pumpkin Purée: Make sure you’re using 100% pure pumpkin, not the pumpkin pie filling—it’s a common mix-up!
- Maple Syrup: The real deal, please. If you use imitation, you’ll miss out on that deep, robust flavor that makes these bars stand out.
- Spices: Cinnamon, nutmeg, ginger, and cloves—these are your pumpkin pie essentials! You could even use pre-mixed pumpkin pie spice if you’re in a hurry.
- Sweetened Condensed Milk: This brings both sweetness and creaminess, giving the filling that irresistible, smooth texture.
Step-by-Step Instructions
- Preheat your oven to 350°F (175°C). Line an 8×8-inch baking dish with parchment paper for easy removal later.
- Make the crust: In a medium bowl, combine 1 1/2 cups of graham cracker crumbs with 1/2 cup of melted butter. Stir until the mixture looks like wet sand, then press it firmly into the bottom of your prepared dish. Bake for 8-10 minutes, or until lightly golden. Let it cool while you prepare the filling.
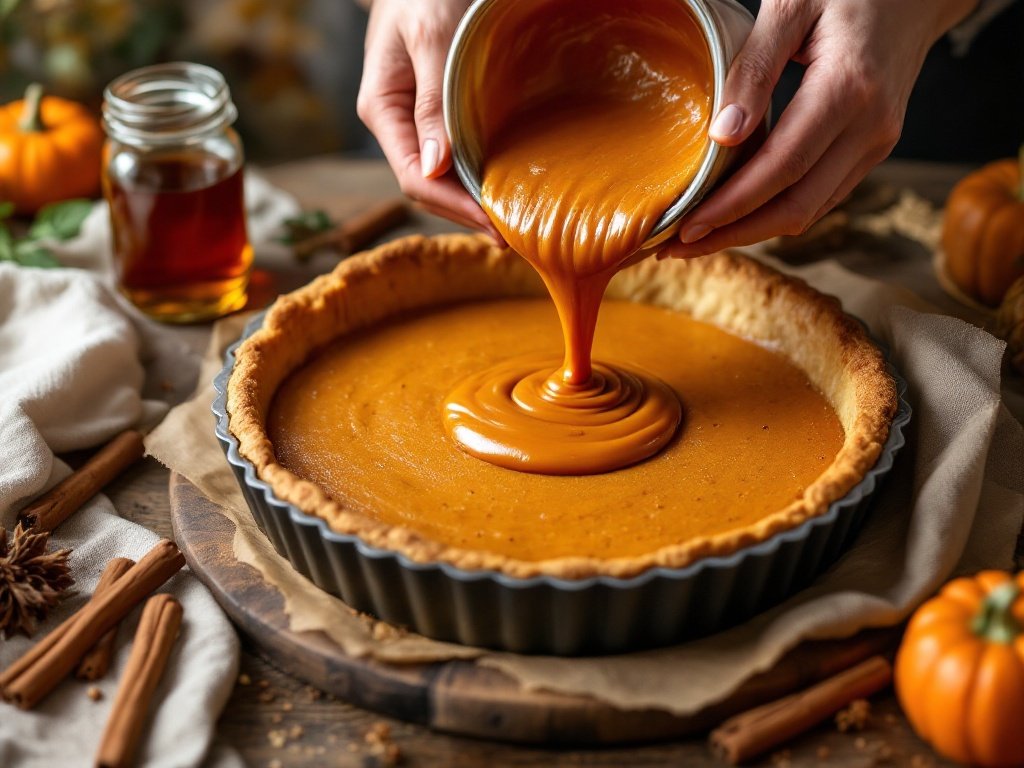
- Mix the pumpkin filling: In a mixing bowl, whisk together 1 can (15 oz) of pumpkin purée, 1/2 cup of real maple syrup, 1 can (14 oz) of sweetened condensed milk, 3 eggs, and 2 teaspoons of pumpkin pie spice (or your own mix of cinnamon, nutmeg, ginger, and cloves). Whisk until smooth and well combined.
- Pour and bake: Once the crust has cooled a bit, pour the pumpkin filling over it. Smooth the top with a spatula if needed. Bake for 45-50 minutes, or until the center is set but still has a slight jiggle to it—kind of like cheesecake!
- Let it cool: After baking, allow the bars to cool to room temperature before chilling them in the fridge for at least 2 hours. This helps them firm up and makes them easier to slice.
- Serve: Once chilled, slice into squares and serve! You can top with whipped cream or a sprinkle of cinnamon if you’re feeling fancy.
Chef’s Tips and Tricks
- Chill for best results: These bars slice cleanly and taste even better after chilling for a couple of hours or overnight.
- For a crunchier crust: If you really love a crunchy base, bake the crust for 12-15 minutes to give it more structure. Just be sure to let it cool completely before pouring on the filling!
- Avoid over-baking: Keep a close eye on the bars around the 40-minute mark. The filling should be set but slightly jiggly in the center. It’ll continue to firm up as it cools.
Recipe Variations and Serving Suggestions
- Change up the crust: Not a graham cracker fan? Try a ginger snap crust for an extra spicy kick!
- Make it dairy-free: Swap the sweetened condensed milk for a coconut milk version (they exist!) and use a plant-based butter for the crust.
- Pair it with a drink: Serve these with a hot mug of chai or pumpkin-spiced coffee for ultimate autumn vibes.
FAQs
How should I store these Maple Pumpkin Pie Bars?
Keep them covered in the fridge for up to five days. You can also freeze them! Just wrap each bar individually and place them in a freezer-safe container. They’ll last for up to three months.
Can I make these bars gluten-free?
Absolutely! Just swap out the graham cracker crumbs for a gluten-free version. There are lots of tasty gluten-free graham crackers out there these days.
I don’t have maple syrup. Can I use something else?
Honey or agave syrup will work in a pinch, but you’ll miss that deep, earthy maple flavor. If possible, grab some pure maple syrup for the next go!
Maple Pumpkin Pie Bars Recipe
Prep Time: 15 minutes | Cook Time: 50 minutes | Chill Time: 2 hours | Total Time: 3 hours, 5 minutes
Servings: 12 bars

Ingredients:
• 1 1/2 cups graham cracker crumbs
• 1/2 cup melted butter (unsalted)
• 1 can (15 oz) pumpkin purée
• 1/2 cup pure maple syrup
• 1 can (14 oz) sweetened condensed milk
• 3 eggs
• 2 tsp pumpkin pie spice (or a mix of cinnamon, nutmeg, ginger, and cloves)

Instructions:
1. Preheat your oven to 350°F (175°C). Line an 8x8 dish with parchment paper.
2. Combine the graham cracker crumbs and melted butter, pressing into the prepared dish. Bake for 8-10 minutes until lightly golden.
3. In a bowl, whisk together pumpkin purée, maple syrup, condensed milk, eggs, and pumpkin spice mix until smooth.
4. Pour the pumpkin filling over the baked crust and bake for 45-50 minutes.
5. Cool to room temperature, then chill in the fridge for at least 2 hours.
6. Once chilled, slice into bars and serve.

Enjoy your cozy bite of autumn!
Conclusion
If you’re in love with all things fall, you absolutely need to try these Maple Pumpkin Pie Bars. They’re easier than pie (literally!) and pack all that autumnal goodness in a convenient, shareable format. If you make these, I’d love to hear how it went! Drop a comment, or share your creation over on Instagram—don’t forget to tag me @TheKitchensAid. Enjoy!