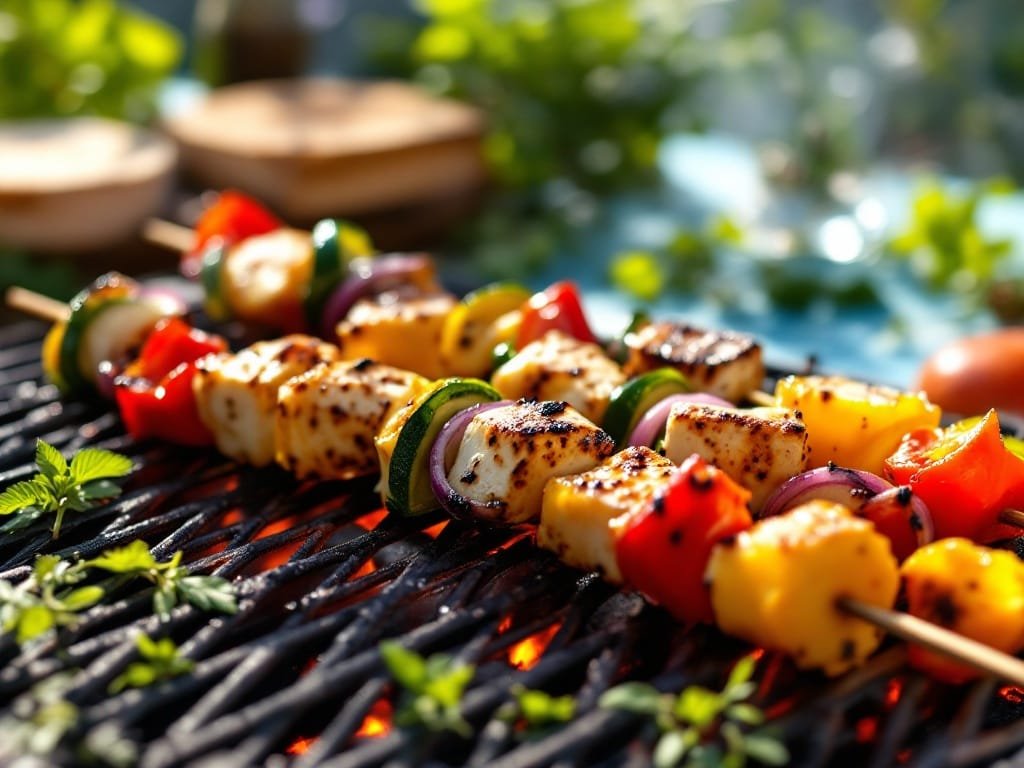
Sunshine on a plate—these grilled veggie and halloumi skewers are what summer dreams are made of! Whether you’re firing up the grill for a weeknight dinner or setting the scene for a backyard get-together, this colorful, flavor-packed recipe is a total crowd-pleaser. With that salty, squeaky halloumi and smoky veggies, it’s hearty, satisfying, and just a little bit fancy—in the easiest way.

Why You’ll Love This Recipe
I whipped this up one summer when we had last-minute guests and a fridge full of veggies—I tossed them with halloumi, skewered everything, and the grill did the magic. It’s become a go-to ever since.
- Colorful, gorgeous presentation that’s super Instagram-worthy
- Quick to prep and even quicker to grill
- Vegetarian and satisfying thanks to protein-packed halloumi
- Customizable with whatever veggies you have on hand
- Perfect for BBQs, picnics, or easy meatless dinners
Ingredients Breakdown
Essentials
- 1 block halloumi cheese (about 8 oz), cut into 1-inch cubes
- 1 red bell pepper, chopped into chunks
- 1 yellow bell pepper, chopped into chunks
- 1 small zucchini, halved lengthwise and sliced
- 1 red onion, cut into wedges (keep layers intact)
- 8-10 baby bella mushrooms, stems trimmed
- 3 tbsp olive oil
- 2 tsp dried oregano
- Juice of 1 lemon
- Salt and black pepper, to taste
- Wooden or metal skewers
Pro Tips
- Soak wooden skewers in water for 30 minutes before grilling to prevent burning.
- Use a grill basket if you’re short on time—no skewering needed!
- Halloumi doesn’t melt—perfect for grilling, but give it space on the skewer so it crisps up nicely.
Step-by-Step Instructions
- Preheat your grill (or grill pan) over medium-high heat.
- In a large bowl, combine the halloumi cubes and chopped vegetables.
- Drizzle olive oil, lemon juice, oregano, salt, and pepper over everything and toss gently to coat.
- Thread the halloumi and veggies alternately onto skewers, leaving a little space between each piece.
- Grill the skewers for 2–3 minutes per side, turning until grill marks appear and the veggies are tender-crisp.
- Serve immediately with extra lemon wedges and a sprinkle of fresh herbs if you like.
Chef’s Tips and Tricks
- Cut everything to roughly the same size so it cooks evenly.
- If your halloumi is really salty, give it a quick rinse or soak in cold water for 5–10 minutes.
- Brush the grill grates with oil to prevent sticking.
Recipe Variations and Serving Suggestions
- Add cherry tomatoes or eggplant cubes for extra variety.
- Drizzle with balsamic glaze or a yogurt-tahini sauce for a flavor boost.
- Serve with couscous, quinoa, or warm pita bread for a full meal.
- Turn leftovers into a salad with arugula, olives, and a quick vinaigrette.
FAQs
Can I make these in the oven?
Absolutely! Just roast the skewers at 425°F for about 20 minutes, turning halfway through for even charring.
How do I store leftovers?
Remove from the skewers and store in the fridge in an airtight container for up to 3 days. Reheat gently or toss cold into salads!
Recipe Card
Prep Time: 20 minutes
Cook Time: 10 minutes
Total Time: 30 minutes
Ingredients:
- 1 block halloumi cheese, cut into 1-inch cubes
- 1 red bell pepper, chopped
- 1 yellow bell pepper, chopped
- 1 zucchini, sliced
- 1 red onion, cut into wedges
- 8-10 baby bella mushrooms
- 3 tbsp olive oil
- 2 tsp dried oregano
- Juice of 1 lemon
- Salt and pepper to taste
Instructions:
- Preheat grill to medium-high. Soak skewers if using wooden ones.
- Toss halloumi and vegetables with olive oil, lemon juice, oregano, salt, and pepper.
- Thread onto skewers, alternating ingredients.
- Grill 2–3 minutes per side until charred and tender.
- Serve hot with fresh herbs or lemon wedges.
Nutrition: 270 calories per serving
If you try these skewers, let me know how it went in the comments! Snap a pic, tag me on Instagram @thekitchensaid, and don’t forget to share this recipe with your fellow grill lovers. Let’s keep the deliciousness going, one skewer at a time!